Rules
What Are Rules?
Rules are the highest level expression of Policy in the Admin Console. Each rule is built using a series of policy objects (Mask Formats, Applications, etc.) which are in turn defined on their own pages of the Policy section.
Rules provide centralized control for enforcing data masking and access policies in Shield. Proper rule ordering and configuration ensure that sensitive data is protected based on user identity, application, and context.
Rule Order
The order of rules in the Admin Console matters. On the main Rules page, all rules are listed in the order that reflects their evaluation priority.
- Rules in the list can be manually ordered using the handle that appears when you hover over a rule.
- If a transaction matches multiple rules, as long as they do not conflict all rules will be applied.
- If a transaction matches multiple conflicting rules, the last matching rule in the list takes precedence.
Creating a New Rule
To create a new rule:
- Click Add New Rule in the upper-right corner of the Rules page.
- A rule editor panel will appear from the right.
- Configure the rule using the following options.
- Click Save to apply the rule.
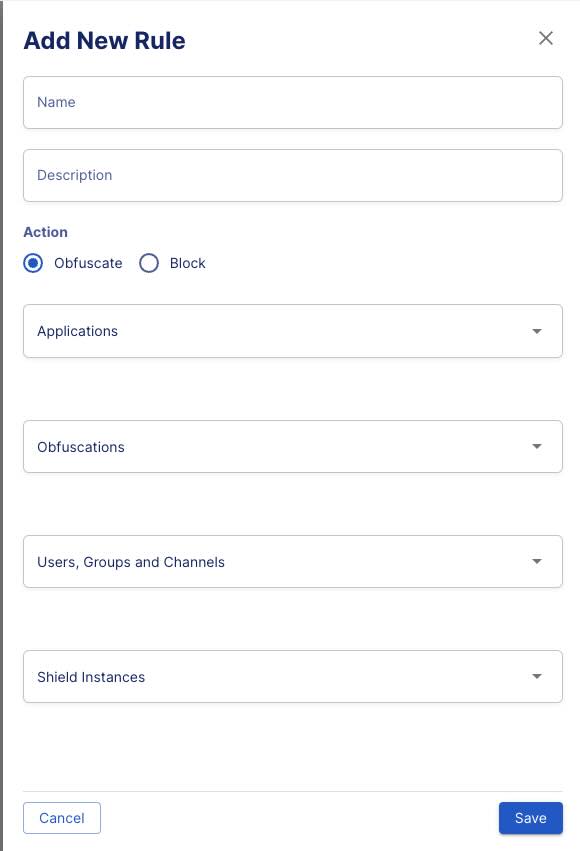
Rule Configuration Fields
-
Name
Required. A unique label for the rule. -
Description
Optional. Additional context or purpose of the rule. -
Action
Required. Obfuscate will apply an Obfuscation policy and Block will prevent the connection from continuing at all. -
Applications
Required. Select one or more applications to which the rule will apply. -
Obfuscations
Required. Select one or more defined obfuscation methods to use. -
Users, Groups and Channels
Optional. If directory integration is enabled, specify user or group filters. If Messaging Integrations are enabled, specify channel filters. See below for more details. -
Shield Instancess
Optional. Select one or more Shield instances to which the rule will apply. Useful for applying different rules to different locations.
Editing an Existing Rule
To edit a rule:
- Hover over the rule name in the list.
- Click the three-dot menu.
- Choose Edit Rule Details.
- Make any changes in the editor panel and click Save.
Deleting a Rule
To delete a rule:
- Hover over the rule name.
- Open the three-dot menu.
- Select Delete.
Enabling or Disabling a Rule
To temporarily disable or re-enable a rule:
- Hover over the rule name.
- Open the three-dot menu.
- Click Turn Off to disable or Turn On to re-enable.
Disabled rules have a status of Inactive, while enabled rules show Active.
Users and Groups in Rules
If directory integration is configured, you can use identity data to apply rules to specific users or groups. If Messaging Integrations are enabled, you can apply rules to specific channels.
- In the rule editor, scroll to the Users, Groups and Channelss section.
- Expand Group, Username or Channel sections to define filters.
- Choose one or more matching methods:
Matching Options
| Match Type | Description |
|---|---|
| is equal | Exact match |
| is not equal | Exact exclusion |
| contains | Substring match |
| does not contain | Substring exclusion |
Example
To apply a rule to both Marketing-East and Marketing-West, use:
Logical OR Behavior
Multiple entries in the Users and Groups section are combined using a logical OR.
- If you specify
Group equals "Sales"andGroup equals "Support", the rule applies to users in either group.